
For a long time I have been outputting Word files from Scrivener in order to upload them to Createspace. This was always a huge pain in the ass, because I would have to tweak the word files to make them look right and then I would have two different files to worry about every time I did a new version of the paperback (the original Scrivener file, and the modified Word file).
This is my step-by-step process for outputting a PDF file from Scrivener that “just works” and is uploadable directly to Createspace without the need for Word or any Word templates. This way whenever I want to change my book, I just modify it in Scrivener and then recompile. No screwing around in Word or cutting and pasting required. 🙂
(Note: I am using the Mac version 2.7 of Scrivener on a Macbook Pro)
Step 1: Get the Page and Compile settings right in Scrivener:
First you need to go to Compile and pick Compile for: PDF down at the bottom.

Then you need to go to the Page Settings tab on the left and click on the Page Setup button.

At that point pull down the Paper Size dropdown and pick Manage Custom Sizes.


In there define the size you want to use. Here is a shot of the one I set up for 5.5″ x 8.5″

Click OK and then you will need to set up your Page Settings. Here are shots of the way I set mine up to give you an idea:
This is the Header and Footer example:

This is the First Pages example:
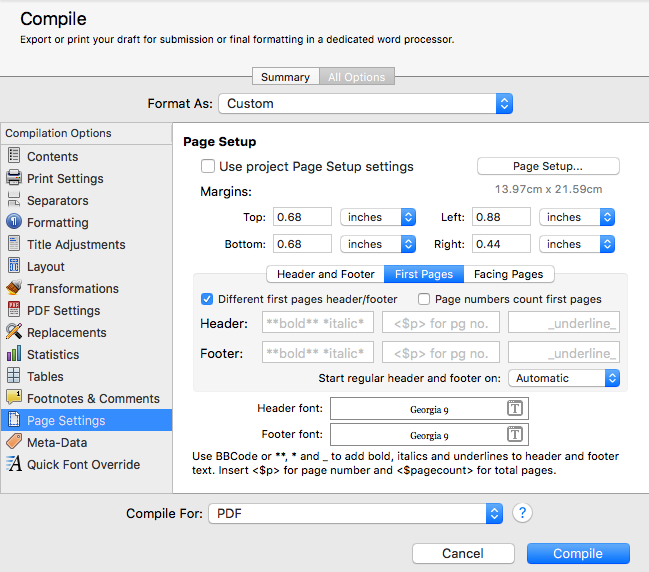
This is the Facing Pages example:

Another important thing to do is to go to the PDF Setting tab and uncheck Generate PDF outline. If you don’t do that Createspace will hang trying to load the file.

Then under the Formatting tab you are going to want to set your body and title text to the fonts and sizes you want. I set mine to Georgia 11.5.
At this point you should be able to compile and have a PDF you can upload to Createspace!
Step 2: The Table of Contents
To create a nice looking TOC, I follow these steps:
First close all of your chapter folders so that you have a list of chapters you can highlight, like so:

Once you have all the folders you want to include in the TOC highlighted, use Edit > Copy Special > Copy documents as TOC to grab the TOC information.

Then create a new blank text file where you want your TOC to be and paste the data into it. It will look something like this:

Highlight all of that and use Format > Table > Table:

And you will end up with something that looks like this:

Now right align all the page numbers and it will look like this:

Chances are that when you compile to PDF, the TOC will be too wide and it will wrap. If that happens just drag the right hand side of the pages column to the left like so:

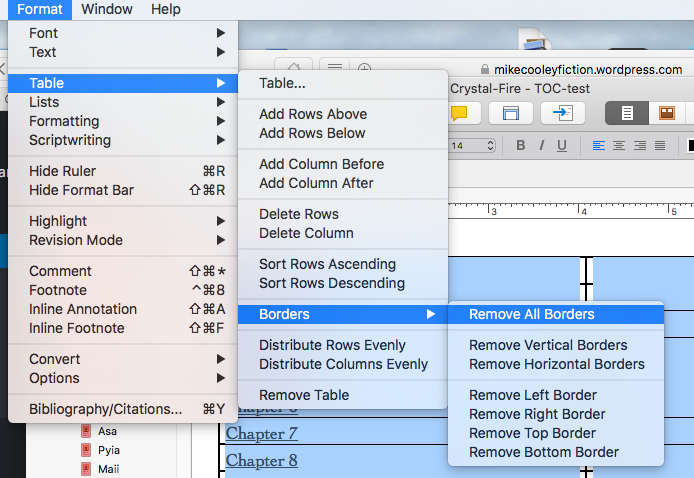
Once the TOC looks perfect in the PDF file, turn off the borders using Format > Table > Borders > Remove All Borders:
Which will leave you with a TOC that looks like this:

Which should look good in the PDF
Step 3: Blank pages to help things align on the right or left side page
When you open the PDF in Adobe Reader (Pro Tip: set the page display to two page view)

If you have a page that shows up on the left hand side, but you want it on the right, you can add a blank page before it in Scrivener to make it work. To do that simply add a blank text file in Scrivener at the correct place and set it to “as is” and “page break before” under Contents:

Results: Here is what the finished PDF looks like with these settings


Step 4: Other gotchas
- Keep in mind that anything marked as “as is” in the Contents will need to have the font types and sizes you want in the PDF set properly in the files. Things that are not marked as is will retain the formatting you set under the Formatting tab.
- Even if your PDF looks perfect in Adobe Reader, it might look slightly different in Createspace, so always use the online previewer to make sure every page looks like you want it to.
- Keep in mind that for paperback books you probably want to convert the links from underlined words to the actual address (e.g. My Blog would change to mikecooleyfiction.com)


Very, very helpful information, thanks, Mike “:)
LikeLiked by 1 person
This looks like a great guide, but would you be able to make something similar for those of us using the Windows release of Scrivener?
LikeLike
I might be able to, but I’m not currently using the Windows version of Scrivener.
LikeLike
Windows version does not allow multiple “first pages” (just a “Not on page 1” option) and you can’t do facing pages, which are useful for the inner binding. Bummer, but maybe someday.
LikeLike
OMG! Thank you so much for this. I just love how generous the writing community is with their hard earned knowledge.
LikeLiked by 2 people
So what do you do to then also create ePub (eBook) format?
LikeLike
Hey Martha! Scrivener can output ePub files directly using the compile settings.
Alternately you could use an application like calibre ( https://calibre-ebook.com/ )
LikeLike